2.2 Work Tracker
This module includes the following topics:
· General Notes on Using Work Tracker
· Overview of the Work Tracking Process
· Getting Started in Work Tracker
·
Using
Work Tracker
Work Tracker is the component of the DCL Production Control
System (
Work Tracker:
·
Displays a current list of available work from
which a user can select a document to work on.
·
Enables a user to start, pause, or complete a
· Displays the work history for a unit (for example, a document).
Table of Contents
2.2.1 General
Notes on Using Work Tracker
2.2.2 Overview
of the Work Tracking Process
2.2.3 Getting
Started in Work Tracker
2.2.3.1 How
to Log On and Select a Project and Task
2.2.4.2 Reference:
The Unit Information Report
2.2.4.3 Reference:
Tool Bar Options
2.2.4.4 Reference:
Tools Menu Options
2.2.1
General Notes on Using Work Tracker
·
When you start a process, a timer icon appears
in your system tray to indicate that Work Tracker is actively tracking your
time.
· Whenever you leave your computer without completing the entire process (for example, proofreading), you must pause Work Tracker until you return.
If you don’t pause, the software continues to track time, which results in a higher value for the recorded time than was actually worked.
You can set a feature called Idle Timeout.
When Idle Timeout is turned on, if you forget to pause, Idle Timeout activates
a pause automatically if you do not touch your keyboard or mouse within the
specified time. For more information, see Reference: Tools Menu Options on page 11.
· You cannot track more than one document at a time.
When Work Tracker tracks a document, you receive an error message if you try to open another.
You must pause your work on one
document before you can record time on another document.
· The Pre-Production task in the Work Tracker software refers to running the page count software.
For more information about page counting, see the topic
called “The DCL PDF Page Counting Tool: PDFCLASS” (Section 3.3) in the Document
Preparation and Page Counting training module.
·
Detailed status on documents is available in the
User Information screen and in various
For more information on these reports, see the training
module that describes
2.2.2
Overview of the Work Tracking Process
Each of the following steps is explained in greater detail
in the topics that follow.
The following are the basic steps for using Work Tracker. For
details on pausing and on marking a process as complete, see Using Work Tracker on page 7.
1. Log on to the Work
Tracker software.
2. Select your project.
3. Right-click the file you require and start
the timer.
4. Pause
the timer when you take a break or go to lunch or when you must work on another
unit.
5. Mark a process as complete when you complete
a process.
2.2.3 Getting Started in Work Tracker
If you are unsure where the software is located on your machine, ask your site supervisor.
2.2.3.1
How to Log On and Select a Project and Task
1. Start the Work
Tracker software, usually by double-clicking your Work Tracker desktop
shortcut.
2. When prompted, log on
to Work Tracker using your user name and password.
When your account is created, you are provided with a temporary password that must be changed the first time you log on. You can change your password at:
https://home.dclab.com/secure/pcspassword.asp
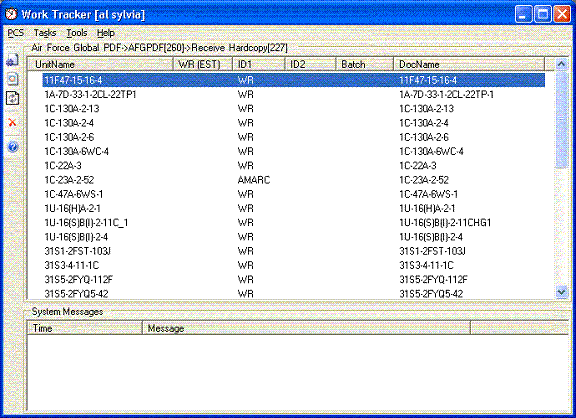
After you log on, the main
window opens as shown in the following image.
3. To open a list of available projects, choose Select Task from the Tasks menu.
The Options pane opens, as
shown in the following image.
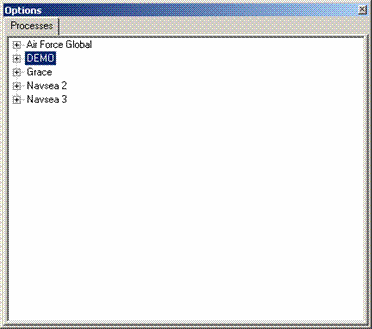
4. Select your project.
The following image shows
directory structure for a sample project and its associated tasks.
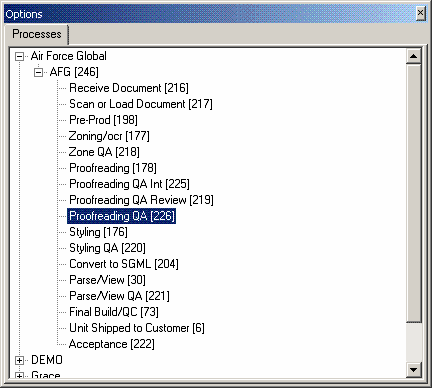
a. To expand your
project to show the required processes, click the +
sign.
b. Double-click your
required task.
The number in square brackets is the step number/ID
used in the Production Control System (
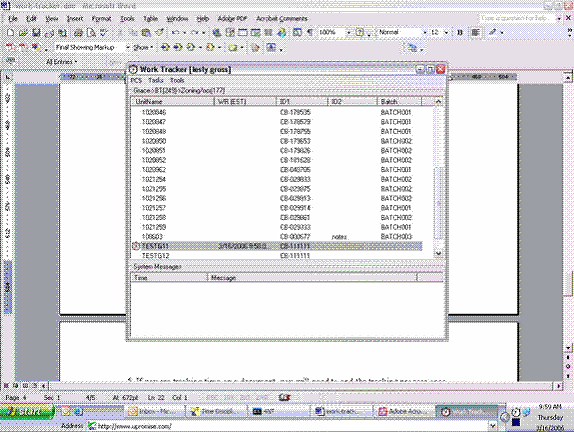
After you select a task,
a list of files in the queue for that task appears as shown in the following
image.
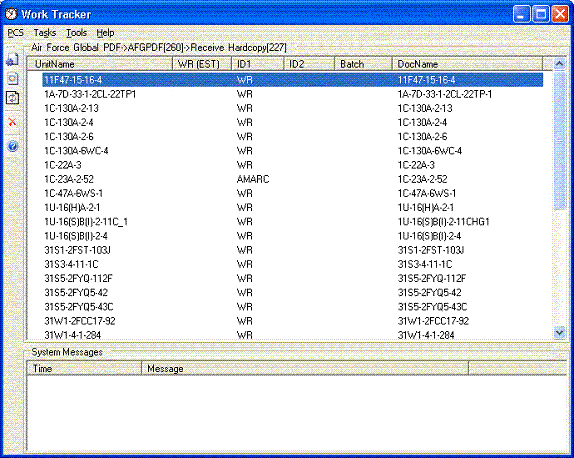
The upper pane of Work Tracker displays files waiting for processing. The lower pane displays system error messages.
The yield sign (yellow triangle) indicates a document that was placed on hold, either by a client or because currently it is being processed (worked on).
You may sort the list by UnitName
or by DocName by clicking on their respective
headers.
Work Tracker remembers the last process you worked on
when you exit the program. The name of your task appears below the menu bar (In
this case, “Air Force Global->
5. To work on a
different project, return to the Tasks menu, choose Select Task,
and repeat the previous steps.
2.2.4
Using Work Tracker
This topic describes how to use Work Tracker to track the time you spend on a task and describes the activity information that is available.
2.2.4.1 How to Track Progress
1. Right-click the unit (document) you want to work on.
A menu appears with the tracking options as shown in the following image.

· Start/Restart Process checks out the unit for this process from the system and starts timing.
For example, to start zoning a document, select Start/Restart Process.
|
Caution: Ensure you are ready to work on the
document before you select this option, as Work Tracker starts tracking time
as soon as you click. |
·
Pause Process is inactive until you check out a unit (document) to work
on.
More information on
this option is available toward the end of this procedure.
· Process Completed updates the status of the process to Complete.
|
Caution: If you accidentally click Process Completed instead of Pause Process, you must tell your supervisor so that the unit can be put back to the correct step. |
·
Unit Information (F8) displays
a report of all the action items corresponding to a selected unit as shown in
the following image.
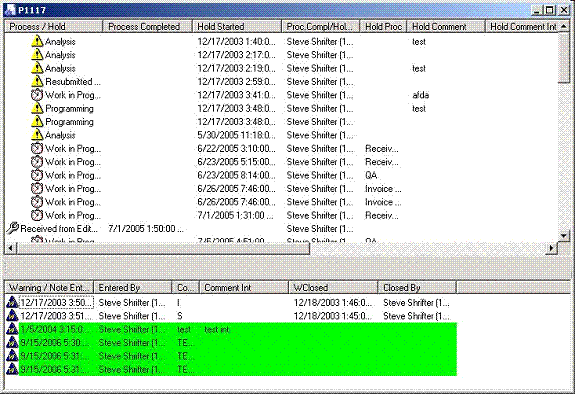
The lower pane displays notes and warning messages. The Comment field is the most important field to check. The warnings are similar to manual Hold processes, but work can continue. With a manual Hold, work on the unit must stop. The light green background indicates that a hold action or a warning is still open.
For information on the columns in the unit information
report, see Reference:
The Unit Information Report on page 10.
2. To
begin tracking time, click Start/Restart Process.
A timer icon (clock) appears
next to the document you selected and near the clock in your system tray, as
shown in the following image.
When you stop working on a unit, either to take a break or go to lunch and so forth, you must stop the timing process.
3. Find the unit in the
list and right-click it.
A menu appears with the
following options:
·
Pause Process pauses the timing process while you are not working on a unit.
Selecting this option pauses the tracking of time and releases the unit so a different user can work on it.
Selecting this option does not indicate that the process is complete. Use this option when you must work on something else or you take a break.
Ensure you stop the timer whenever you stop work for an extended period of time (including taking a break). If you fail to pause the process, Work Tracker continues to collect time, and the information collected will be incorrect.
Notes: For information on setting the Idle Timeout feature which pauses the timer automatically after your computer is idle for a pre-defined amount of time, see Reference: Tools Menu Options on page 11.
If you forget to pause and you close Work Tracker, the
step is paused automatically, but this is not recommended.
·
Process Completed marks
the process as completed (and indicates the document is posted on the FTP site,
if required).
If you are responsible for internal QA for a process, when you mark the task as complete, the system sends an e-mail message to DCL with a link to the expected FTP server location.
Important: Ensure you post the file to the FTP site (if required) before you mark the document as complete.
|
Caution: If you accidentally click Process Completed instead of Pause Process, you must tell your supervisor so that the unit can be put back to the correct step. |
4. If you are taking a break or must work on something else, select Pause Process.
5. When you complete a process, select Process Completed.
6. When the dialog box appears to confirm your action, click OK.
The unit disappears from the list and is no longer available to you for this process. At the same time, the unit becomes available for the next task.
2.2.4.2 Reference: The Unit Information Report
The following table lists and describes the information available from the Unit Information report and where appropriate gives an example. All times listed are in your local time zone.
|
Process Name
/ Icon |
Description |
Example |
|
Process/Hold |
Displays a description of a
process or a hold action. |
Load Document |
|
Process/Completed |
Displays a date and time when
process was completed. |
|
|
Hold Started |
Displays a date and time for when the hold was started. |
|
|
Proc. Compl/Hld. StartedBy |
Displays the name of the person who completed the process or the name of the person who started the hold action and the code for the facility. |
Mary Jones |
|
Hold Process |
If a hold is associated with a process, displays the name of the process. |
Styling |
|
Hold Comment |
Displays comments about the hold activity. |
|
|
Hold Comment Int |
Internal (or additional) comments corresponding to the hold action. |
|
|
Hold Assigned to |
Displays the name of the person assigned to this hold action and the code for the facility. |
John Smith |
|
Hold Closed |
Displays a date and time. |
|
|
Hold ClosedBy |
Displays the name of the person who closed the hold and
the code for the facility. |
Mary Jones |
|
Rollback Date |
Displays the date when a process was rolled back. |
|
|
RollbackedBy |
Displays the name of the person who rolled the process back and the code for the facility. |
Bob Doe |
|
|
Represents a |
|
|
|
Represents a “rolled back”
process. |
Rejection of a document that
was proofread. |
|
|
Represents an automated Work
In Progress. |
|
|
|
Represents a hold action that was created by an automated task. |
|
|
|
Represents a manual Work In Progress. |
|
|
|
Represents a Hold action. |
|
·
Refresh (F5) queries the
· Rollback rolls a document back to the previous task.
Note: Do not use this feature on a regular basis. If you are not sure when to use it, check with your supervisor.
2.2.4.3 Reference: Tool Bar Options
You also can use the tool bar. When you mouse over the icon,
the name of the option appears.
The following table lists and describes the options you can
access from the tool bar.
|
Option |
Description |
|
Unit Information |
Displays
the table (report) of unit information described previously. |
|
Show Current Activity |
Displays the Current Activity
report, a report of the current activity at your site. |
|
Refresh |
Refreshes the screen. |
|
Clear Messages |
Deletes system messages from the
Systems Messages pane. |
|
Help |
Displays the help file. |
2.2.4.4
Reference: Tools Menu Options
From the Tools menu, you can access the following options
including the Idle Timeout feature:
My WIP Items shows the open processes started
by the user, if any.
Clear messages deletes system messages from
the Systems Messages pane.
Auto Refresh If set to On
(checkmark appears beside it), the program automatically queries the
By default Auto Refresh is set to On. However, you can turn it off (uncheck the option) from the Tools menu. To reduce Work Tracker related Web traffic (if that is an issue at your facility), you can refresh the data manually by pressing F5 or clicking the Refresh icon on the toolbar.
With Auto Refresh turned off, Work Tracker (even when run constantly) does not generate traffic until you press F5 for one time transactions (refresh).
Idle Timeout automatically pauses the process started by a user when the user’s computer is idle for a pre-defined period of time.
You can select ½ , 1, 2, 4, or 8 hours.
The default is ½ hour.
The following image shows how to set Idle Timeout by selecting the option from the Tools menu and then selecting a specified period of time. You also have the option to disable the feature.
